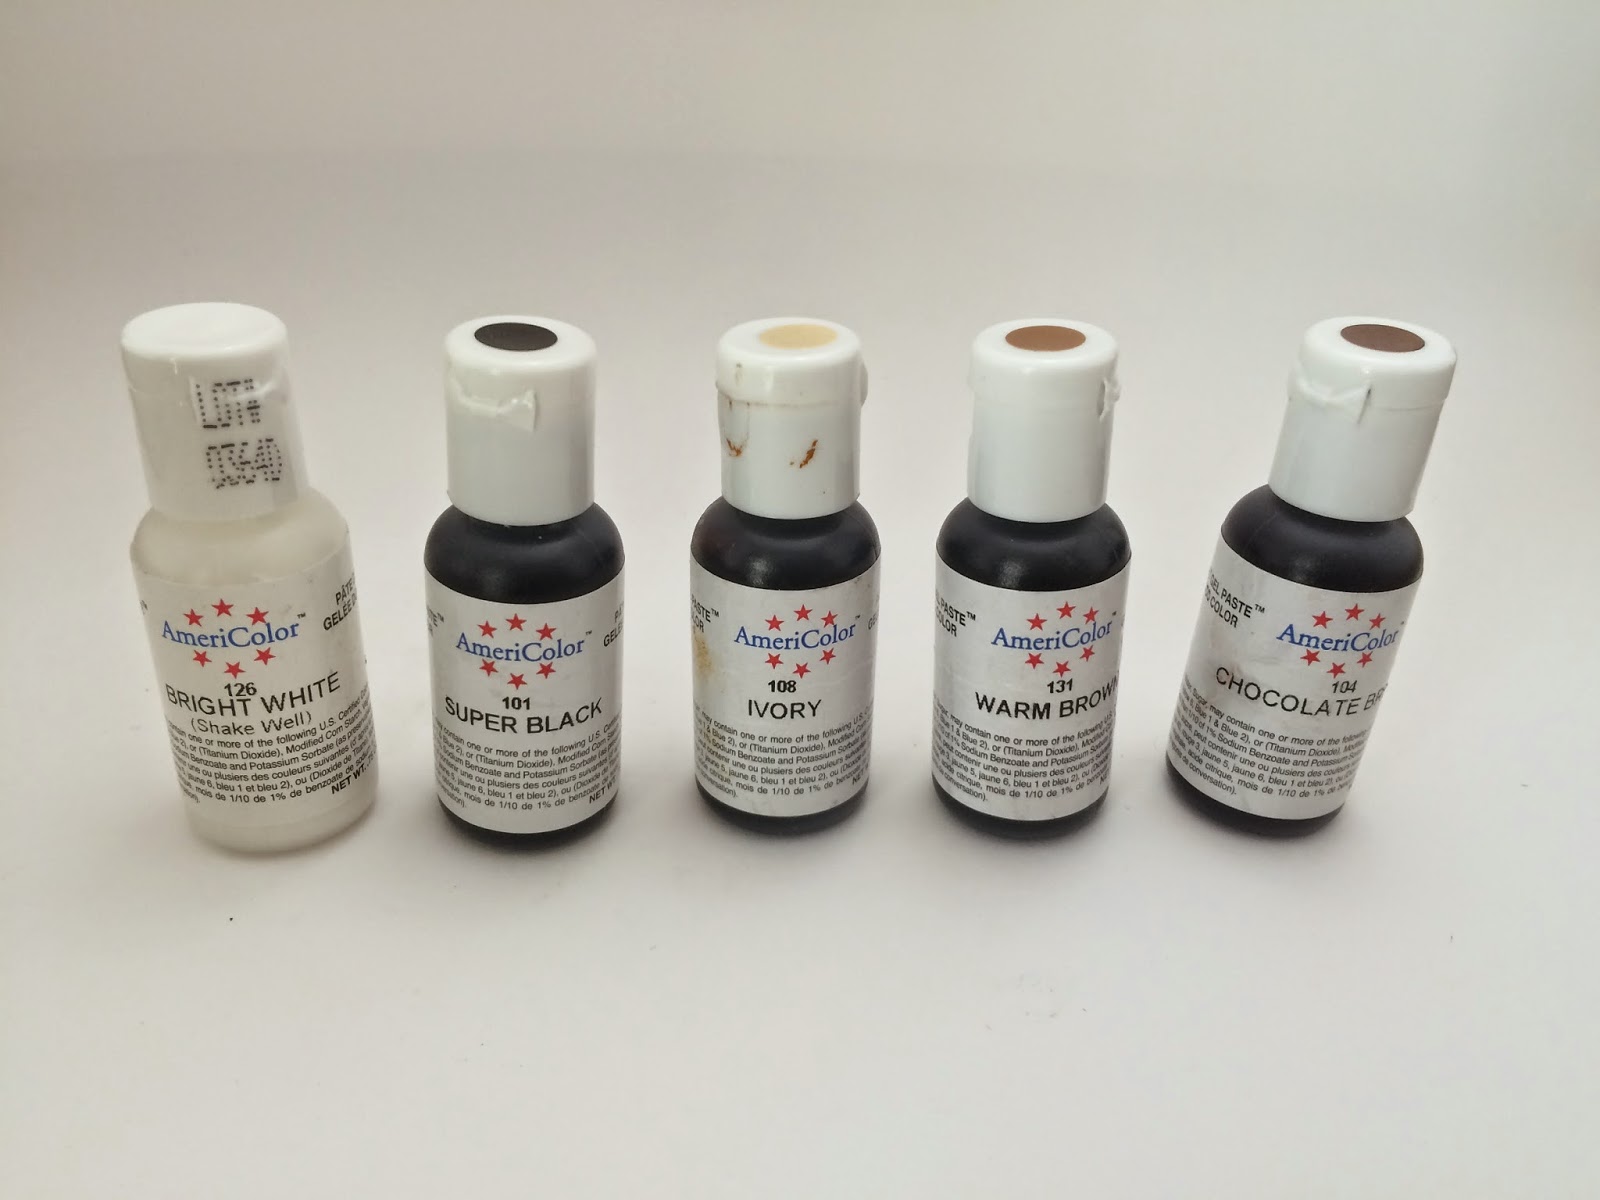
My Pages

Saturday, January 31, 2015

Review: Americolor Food Coloring

Today I will be reviewing the Americolor Soft Gel Paste Food Color. I will have pictured below all the colors that I own, and of course all the names and where I bought them. I cannot wait to buy more, as these are extremely good pastes.


Neutrals:
From Left to Right
1. #126 Bright White
2. #101 Super Black
3. #108 Ivory
4. #131 Warm Brown
5. #104 Chocolate Brown
My Thoughts & How I Use Them:
Who knew White would be such an important color especially if your royal icing is already white. The next time you whip up a batch add a squeeze of Bright White and you will be amazed at how you can make white "whiter".  Warm brown is "warm" and Chocolate Brown is a     "cool' brown.  Ivory looks very golden when it comes out of the bottle but is does make your icing a lacey ivory shade.  In my previous post, the Cowboy Cookies used a lot of Super Black to make them REALLY black.  It turns your teeth and tongue black.  That's great when you are five, but not 35.  Next time I would make tan riding boots or even pink cowgirl boots.


Pinks & Reds:
From Left to Right


1. #133 Maroon 
2. #118 Burgundy
3. #119 Red Red
4. #165 Electric Purple
5. #164 Electric Pink
6. #114 Deep Pink
7. #132 Soft Pink


My Thoughts & How I Use Them:
I have all of these "pink" colors and I really have only used Soft Pink and Red Red.  I wish my local Hobby Lobby had Tulip Red as I would like to try it.


 Oranges & Yellows:
From Left to Right

1. #113 Orange
2. #125 Terracotta
3. #117 Peach
4. #105 Copper (Flesh tone)
5. #106 Egg Yellow
6. #107 Lemon
7. #135 Gold


Thoughts on These & How I Use Them:
Egg Yellow is my "go to" yellow.  Some how I bought two Lemons.  Don't know if I will ever open the second one!


Greens:
From Left to Right

1. #109 Forest Green
2. #111 Leaf Green
3. #110 Teal
4. #112 Mint Green
5. #129 Avocado


Thoughts on These & How I Use Them:
I LOVE Avocado!  The fruit and the color.  It makes a wonderful soft green that is not too intense.  Another tip is to use Teal with Sky Blue to make a beautiful Tiffany Blue.


Blues & Purples:
From Left to Right

1. #128 Turquoise
2. #103 Sky Blue
3. #134 Navy Blue
4. #122 Violet
5. #130 Regal Purple


Thoughts on These & How I Use Them:
Sky Blue is beautiful and Violet live up to its name. Not much to say about these other than they are great vibrant colors.
With love,
Kim

"And a girdle [of] fine twined linen, and blue, and purple, and scarlet, [of] needlework; as the LORD commanded Moses." - Exodus 39:29


Saturday, November 8, 2014

Cowboy Cookies: Hats, Boots, & Flags

Howdy y'all! Instead of sharing a recipe with you this week, I decided to feature some "cowboy" cookies I made earlier this year. I hope this inspires you to get into the Texas spirit and make some adorable cookies.

As seen in the pictures below, I took a spin on some cowboy boots, originally posted by Bridget at bakeat350.blogspot.com. I also created some cowboy hats with red rims, and altered the Texas flag to fit on a star cookie. You can also personalize this for your state or country's flag as well.

Have a wonderful holiday season, and new cookies and recipes will be posted soon!


With love,
Kim

"Whatever you do, ride with all your heart, riding for the Lord, and not for men." 
Colossians 3:23 

Saturday, October 25, 2014

S'more Cups: Ooey, Gooey, Goodness

This post is all about the most popular campfire snack- the S'more. This recipe is a twist on the traditional S'more into something full of flavor and very easy to make! (and in my opinion even better than regular s'mores)

Prep time: 30 minutes
Total time: 3 hours
Yield: 24 cups
-----------------------
Serving size: 1 cup
Calories per serving: 100

Ingredients:
7 whole graham crackers (1 cup/3.8 ounces, finely crushed)
1/4 cup powered sugar
6 tablespoons butter, melted
4 bars (1.55 ounces) milk chocolate candy, divided
12 large marshmallows

1.) Pre-heat oven to 350 degrees. The original recipe called for 7 whole graham crackers.  Before you return your graham crackers to the grocery store because they are broken remember you are going to smash them anyway. I have included the weight for your convenience.  Whether they are smashed or whole 3.8 ounces is the same. Then place graham crackers into a Ziploc bag and finely crush into crumbs. Release your inner beast during this process as you probably don't get to pound things all that often. Combine graham cracker crumbs, powdered sugar, and butter into a small bowl. Using a small scoop or a spoon, place a scant scoop of crumb mixture into each cup of a small cupcake pan. Press crumbs to form shallow cups with a "mini tart shaper" (Google this LOL). Bake 4-5 minutes or until the edges of the graham cracker cups are bubbling. Meanwhile, break two of the candy bars into their individual rectangles. (There are 12 rectangles in each candy bar, making for the perfect amount, resist the urge to eat it now, there will be some left over later!) Remove the pan from the oven and place one rectangle into each cup.


2.) Cut your marshmallow in half crosswise using scissors dipped in cold water (To me, this is optional. I did not have a problem with the fluff sticking to the scissors). Place one marshmallow half, cut-side down, into each cup, Return to oven for 1-2 minutes. Remove pan from oven, and let cool for at least 15 minutes. Then, carefully remove cups from the pan and then let cool completely. Do not make the mistake I did the first time baking these yummy treats. I placed them directly into the refrigerator. The butter made the graham cracker cup stick to the pan and it was difficult to remove them.
3.) Break remaining candy bars and place in a bowl. This is where you have "extra".  You will need the bars to make enough chocolate for dipping but you will not use all the chocolate. Microwave on 50% for 30 seconds, or until melted smooth (remember chocolate melts by stirring, so if you afraid of burning your chocolate, put the candy in for 10 second increments and blend each time). Dip the top of each marshmallow in the melted chocolate. (I like to call this the hat LOL). Then turn the cup top-side up and let stand from 45 minutes to an hour, or until set.  The humidity in your area will affect the time it takes for the chocolate to set.  In Texas this could be hours - so stick them in the refrigerator for a few minutes. This is a good opportunity to taste test one while the refrigerator door hides you from vultures.

[Disclaimer: The ingredient list and basic preparations are from the Pampered Chef book Simply Sweet, but I have added in tips and tricks of my own. Feel free to tweak the recipe to your liking. Enjoy!]

Sunday, September 21, 2014

Thick & Chewy Chocolate Chip Cookies

Today I am here to share with you my fool-proof chocolate cookie recipe! Read below for more mouth-watering details and info!

Prep:

Pre-heat Oven to 325 degrees
Makes approximately 30 cookies  (depending on how much dough you eat)


Ingredients:

12 Tablespoons (1.5 sticks) unsalted butter, melted and cooled until warm
1 cup packed (7 ounces) light or dark brown sugar
1/2 cup (3.5 ounces) granular sugar
1 large egg plus 1 egg yolk
2 teaspoons vanilla extract

2 cups plus 2 tablespoons (10.6 ounces) unbleached all-purpose flour
1/2 teaspoon baking soda
1/2 teaspoon salt

6-8 ounces of semi-sweet chocolate chips

Other Notes:

The mixer I use is the KitchenAid Classic Plus, and you can find a link to it here (I did not buy it directly from KitchenAid, I DID use the link cited)
The cookie scoop I use is from Pampered Chef, and can be found here

Melt the butter in a 4 cup glass measuring cup in the microwave. 1 to 1.5 minutes at 50% gets the job done. Check it every 30 seconds or so and give it a quick stir.  (Do not let the butter get hot - you do not want to cook your eggs.)   Pour the warm butter in your mixer's bowl. Weigh or measure the granular and brown sugar then thoroughly blended with the butter. I like to let my mixer run for a few minutes with just the sugars and the butter.  It  makes the mixture light and fluffy and helps to cool the butter down.  Add the egg, the yolk, and the vanilla directly into the mixing bowl and blend until combined.  Measure the flour, baking soda and salt in a separate bowl.  Add the dry ingredients to the mixer and beat at low speed just until combined.  If you  trust your mixer to fold in the chips without breaking them - do it.  If your butter is too warm it will melt the chips.  All of this I have learned from past batches of cookies.  I pass my wisdom on to you.

Line your baking sheet with Parchment Paper.  I bake everything on parchment paper. Use a Medium Cookie Scoop and space 12 cookies evenly on your parchment paper.  Bake at 325 degrees for 8-10 minutes. You will know they are done when the edges are light, golden brown and the centers still look soft and fluffy. The dough will keep in the refrigerator for several days. I Love fresh baked cookies!   I will mix a batch and bake what I need.  Then I will scoop the remaining dough onto a cookie sheet and freeze them for 15 minutes, and transfer them to a freezer zip-bag.  Make sure to label the bag with the Date and Recipe Name. Then I can bake what I need in the following days.  Remember that frozen cookies will take a bit longer to bake.  You might even like baking frozen dough - the edges brown and the centers are even softer and more gooey.

Afterwards I like to let them cool for a minimum of 10 minutes on my cook top.

[Disclaimer: The ingredient list is from Baking Illustrated, but the mixing is my own technique]

With Love, 

Kim

Sunday, September 14, 2014

Welcome to Catholic Confections!

Hello friends!

I'm so happy you have found my blog! My goal is to bring you informational, spiritual and unique postings about confections, inspired by my family, friends, and above all else, God. I have had the privilege to be a stay-at-home mom for 14 years.  I have enjoyed many diverse hobbies in my lifetime, but I have always loved experimenting in the kitchen, especially baking.  This summer I've fallen in love with  Royal Icing, and since then I have been obsessively testing recipes, decorating cookies and stalking other cookie bloggers.  I can't wait to bring you amazing creations! There are many wonderful cookie artisans blogging, and I have been encouraged to create my own blog and and share my recipes, techniques and decorated cookies.  My faith is a huge part of who I am and that is why my blog is named, "Catholic Confections."

With Love,

Kim

"For where two or three are gathered in my name, there am I in the midst of them."
 Matt 18:20